Friday, February 26, 2010

Blooming Belt

Awhile back I saw this incredible rose belt on anthropologie, and as usual just knew it was something that wouldn't fit so nicely into our tiny budget.  So, I thought I'd give it a try!  I used some old material I already had, so I guess for being free it didn't turn out too shabby.  It was fairly easy to make, but I would make some adjustments next time around.


some fun spring bling!

by Suzanne

Tuesday, February 23, 2010

Divine

I have this old banana republic shirt that I love, but I wanted to add a little something to it so it can feel new to me again :)

This tutorial is pretty general, this flower is harder to explain because I wanted it to look a little less uniform so I just eyeballed it as I went. It was a little trickier, but LOTS of fun!

This rose is made out of silk.  I used felt for my base and did a couple of layers as shown below.  I just sort of pleated the material the way I liked it and stitched the material in place adding about 4 layers.
Here is just the silk flower, you could leave it like that if you like...

but I decided to add tulle for texture.
There you have it!

My original idea was to put three flowers on it, but this turned out too big and I liked the way it looked alone.  I wasn't sure how this one would turn out because it was just freehand, but I really like it.  I think I might add these to some plain spring tee shirts using brighter colors and multiple small flowers. 
Hmmm...another post to come on that!

by Suzanne

Saturday, February 20, 2010

Brilliantly Beautiful

Well this title probably has more to do with my model than my work. Isn't she stunning? ;)

It's amazing how inexpensive it is to make something like this. Just a little side note, I get all of my headbands from the dollar store. I know....cheap, right?  They usually come in a pack of 6.  I buy the elastic ones for Grace and metal ones for me.  That is a total of $2 for 12 headbands, awesome.  I actually prefer buying them there because they have nice rubber on the ends so it doesn't hurt my head...the only bad thing about wearing a headband! Also, see what fabric you have to work with around your house.  You might be surprised what you can find, or what old clothes might be put to better use. :)   I will do a later post on my headband.  We are taking some spring family pictures soon, so I made this one to match her outfit.

It was fun to add a little variety with patterns, tulle, and ribbon. I think it was good to switch it up with a thicker headband too.  I want to add a few embellishments on this piece, but for now this is what it looks like.  Yet again a project to keep me occupied while the hubby is delved in his school work.  He's so wonderful.

she was cracking me up pulling all sorts of faces tonight! Oh and uh, don't mind the drool she's working on her second tooth ;)

by Suzanne

Thursday, February 18, 2010

Tiny Little Rose Buds

Definitely a way to make earrings on a budget! :) I used 6mm ribbon that I already had in the closet and did the same roll/twist technique as the other flowers. You can get earring backs from just about any craft store for just a few dollars and I just used my glue gun for adhesive.  These were inspired by my Grandma's old vintage looking earrings.  I LOVED her style.  Now I just need a black pair...
Told you we'd get better. ;)

by suzanne

For Ashley :)


Here it is, In all it's glory ;) We'll get better at this. I promise! Thanks for looking.
by suzanne

Necklace Love

I simply love a good necklace and it's amazing what it can do for a simple outfit.  This one makes me feel all warm and springy inside. This is another piece inspired by Miss Ruby Sue and I had so much fun making it. While Matt was working on his big paper last night, I did this....ahhhh accessories....

by Suzanne

Thursday, February 11, 2010

Budding Before My Eyes

Using the same flower I previously used I wanted to dress up a simple onesie. We all know how expensive clothes can get for babies, and they grow so quickly! At least Grace seems to be, so here's a simple way to dress up something you already have and make it unique!  I included a few pictures this time. 

After making a ruffle with your fabric, starting on one end turn the fabric and
hold the flower in place as you go. You can make it tight or loose, depending on the look you want.
When you are all finished hand stitch the bottom together.  I usually go through it a couple layers at a time.  Go over it until you catch all of the loose ends.
Once I finished them I just sewed them onto the onesie. 
Once again I used Grace as my model but I apologize about the pictures! She LOVES rolling over which is great but it doesn't exactly show off her clothes so after awhile of this
we moved to the chair.  She didn't want to hold still then either. :) But I think you get the idea!
I put a few of the flowers on the side of her headband as explained in Michelle's tutorial yesterday

There's some flower power for ya! ;) Hope you are having a beautiful day!

by Suzanne

Tuesday, February 9, 2010

Month of Roses

We are dedicating this month to Roses and have discovered the possibilities are endless. Truly, they can transform just about anything from blah to ahhh...and we haved LOVED experimenting!
 Feel free to drop by this month and get inspired!

The Hat

I have been wanting to knit Grace a cute winter hat for months now.  I am still in the process of learning HOW to knit, so at this point in the year I thought I better just hold off and work on it next fall.  A couple of days ago I was rummaging through some of my old clothes and I found an old red knitted hoodie sweater from American Eagle.  As I examined the sweater it sparked an idea...use the hoodie for her hat! I immediately went to work and measured how much I would need.  I did a stitch around the bottom so the thing wouldn't unravel :) and then I sewed a ruffle at the bottom.
I will only tutorial the flower for the sake of time. I also apologize that I forgot to take pictures as I went, first timer...;)

THE Rose

 I cut about 1 1/2"X16" of fabric and sewed 1/4" seam right side facing out.
 I left extra string on each end so when I was finished I could pull the ends which caused the fabric to make a ruffle.  Starting on one end I wrapped the material counter clockwise, turning it in circles.  Once my rose was complete I hand sewed the bottom together making sure I caught any loose ends.

(Again, I apologize for not having pictures. Hopefully this makes sense! I will post another tutorial on this later with pictures)


I then placed the flower and hand sewed it into the hat. 
Finally, I attached the ribbon to both sides.
(To keep it on her cute, wiggly head!)
This picture brightened my entire day!

There you have it! Who knew the hat was just sitting in my closet?! Ha ha. 
A bit makeshift, but I think the flower MADE it.

*What can you dress up with a rose?
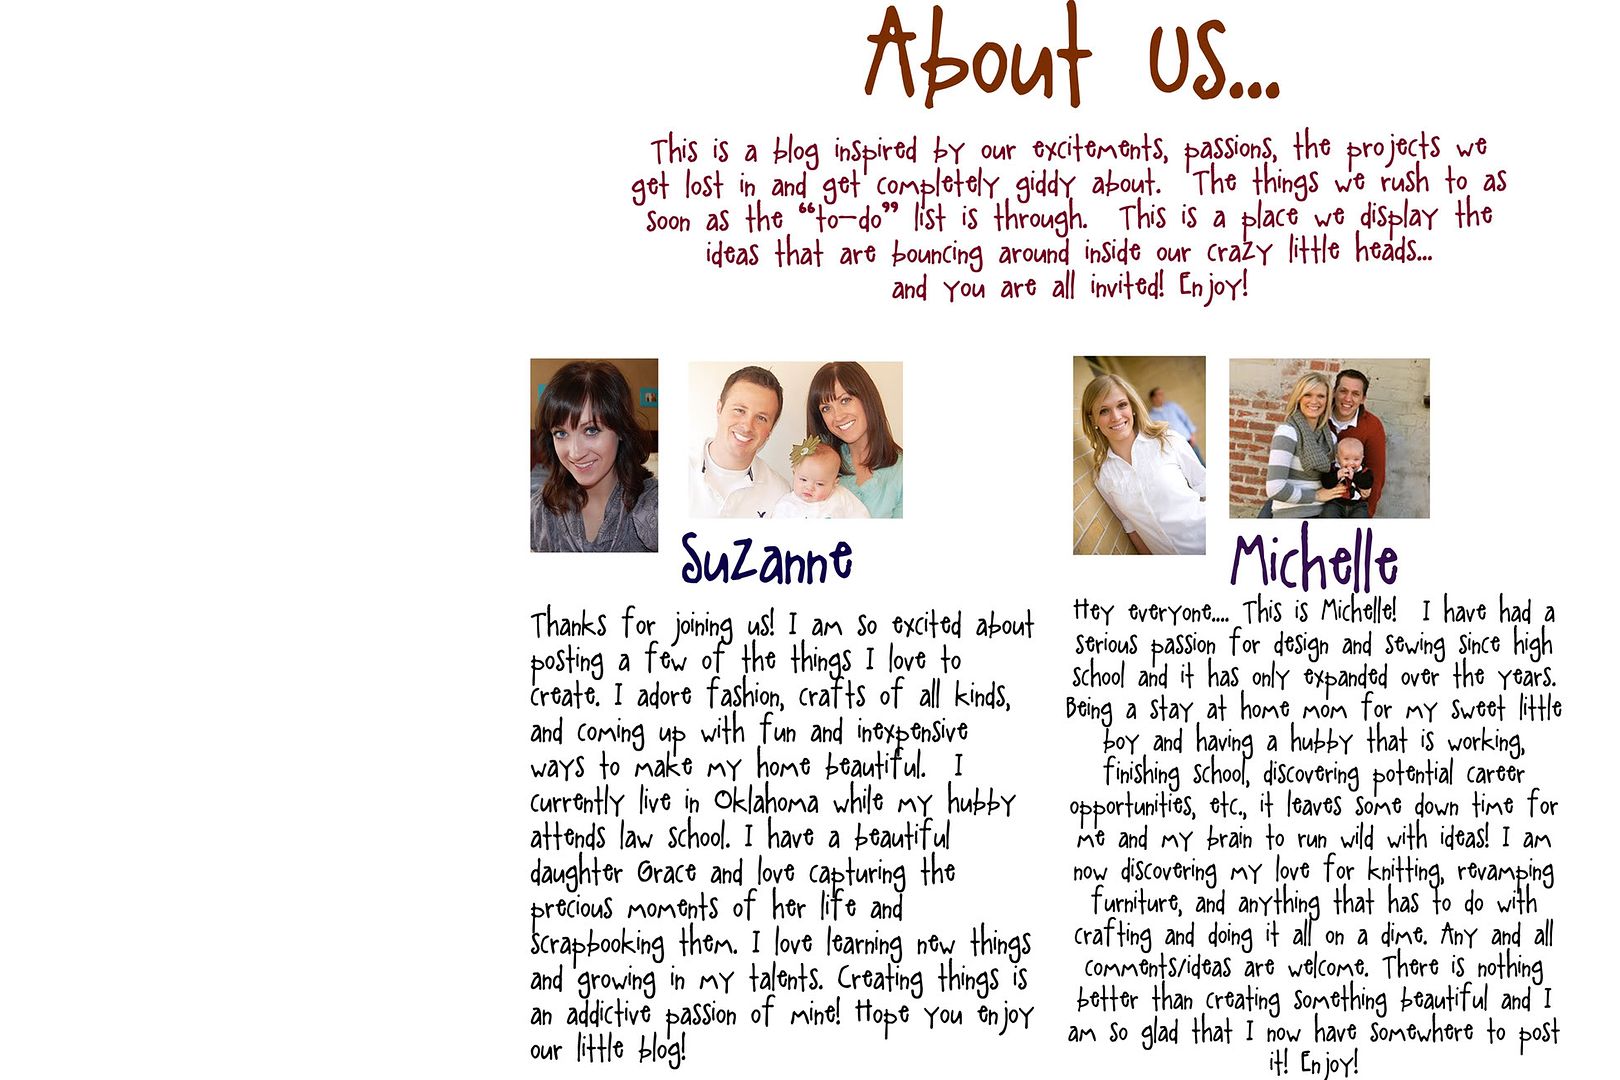
by suzanne